I thought I spoke English until a bus driver in Cork threw me...
An introduction to PhenoSelect, an open-source deep learning pipeline designed to automate leaf segmentation and trait classification in High-Throughput Plant Phenotyping (HTPP). Built on the YOLOv11 framework , this tool processes RGB-NIR and hyperspectral imagery to extract quantitative leaf-level data.
There is an old saying in programming: “I will happily spend six months writing code to automate a task that would have taken me three days to do manually.” (… Or something like it)
During my recent internship at Forschungszentrum Jülich (FZJ) in Germany, I lived this cliché. But to be fair, the scale of the problem demanded it (At least that is what I’m telling myself in hindsight to justify spending six months on it). I was working with data from the “FieldWeasel” – a massive, gantry-based High-Throughput Plant Phenotyping (HTPP) platform (see image below). It captures thousands of high-resolution RGB, Near-Infrared (NIR), and Hyperspectral (HSI) images.
While an “Analysis Bottleneck” isn’t a given in every plant science project, the sheer output of the FieldWeasel made it inevitable here. We had the data, but we couldn’t simply see the water stress with the naked eye. We needed the hard numeric data hidden in the pixels, and extracting that was the challenge.
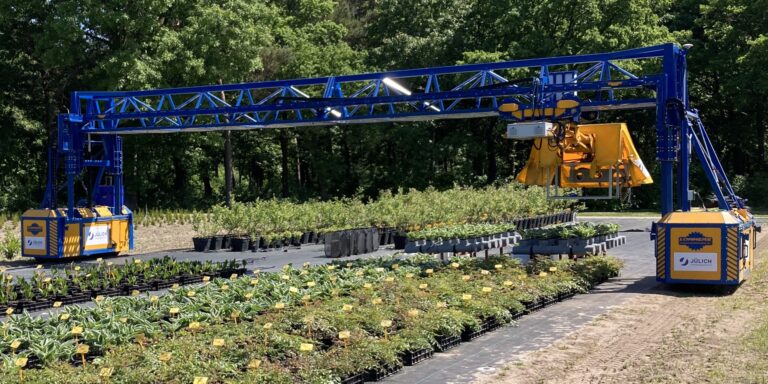
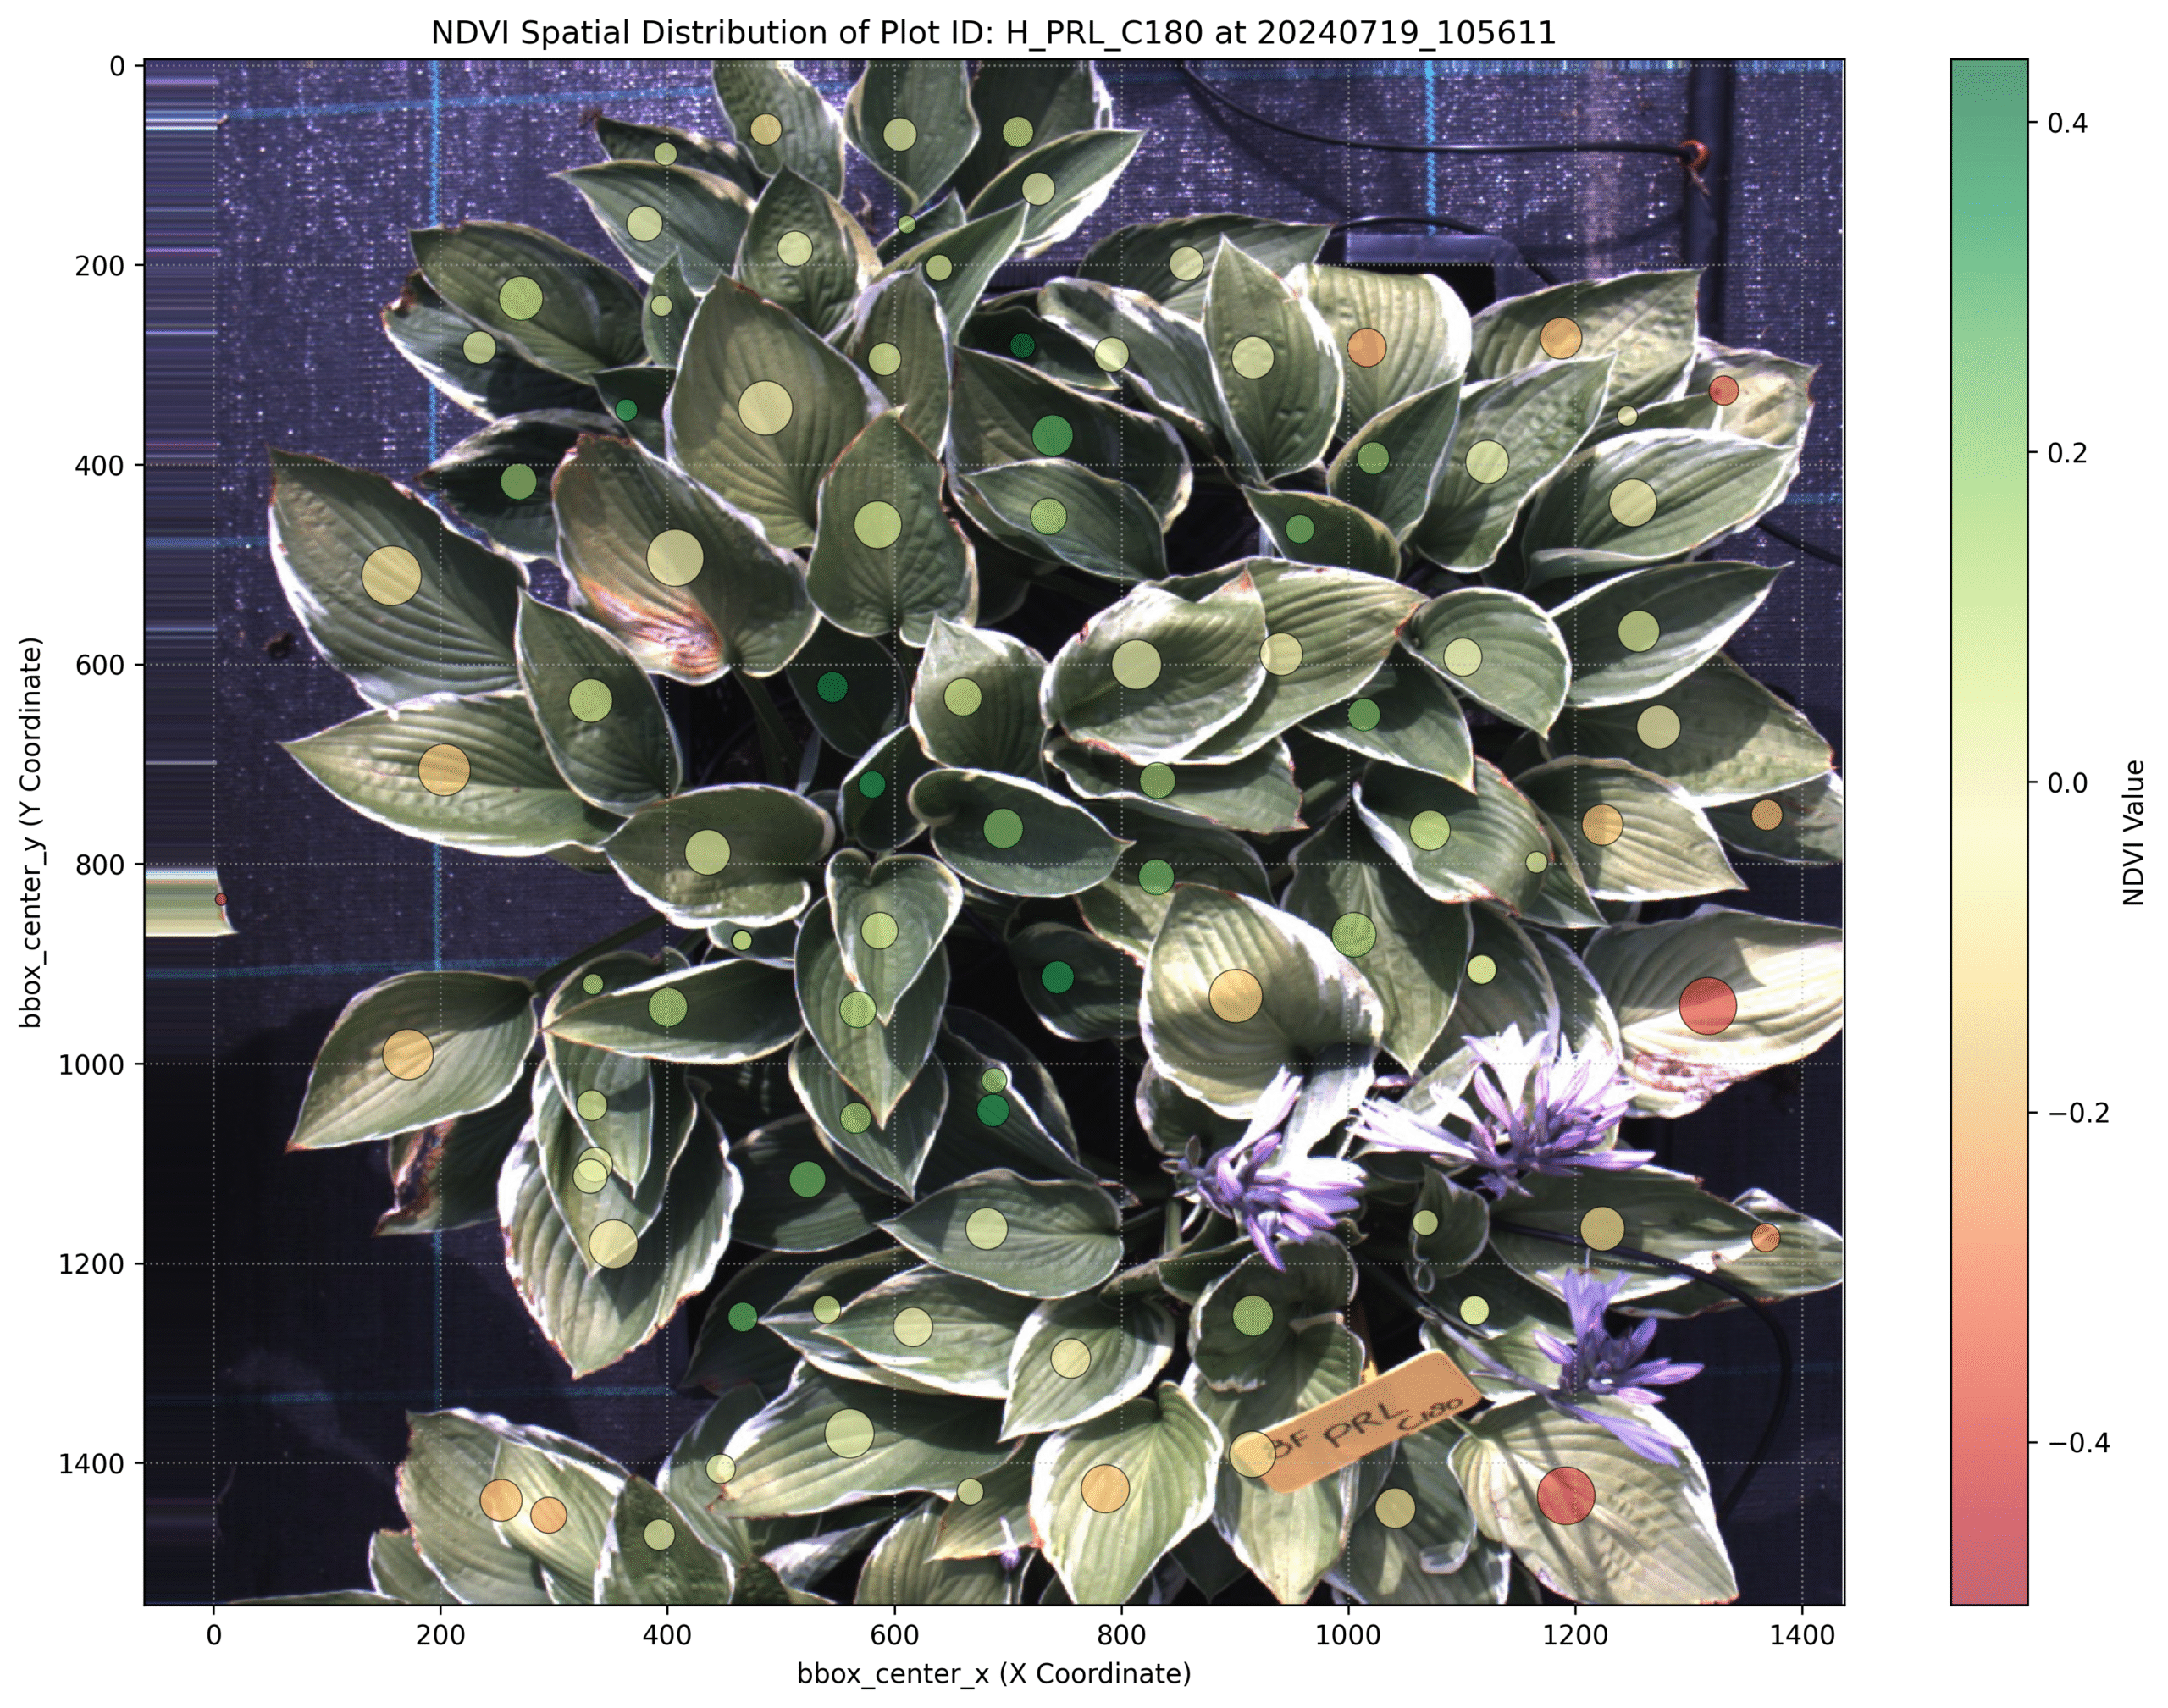
Here is the math that kept me up at night: Consider a modest experiment with 100 blueberry plots, imaged at five time points. If each plant has roughly 200 leaves, that is 100,000 leaf instances.
If I were to manually annotate those (identifying the relevant 1% of the dataset, counting them, and outlining them) and if I was incredibly fast (1 second per leaf), that single experiment would cost me 3.5 days of continuous, non-stop clicking. No coffee breaks. No sleep. Just clicking.
I decided there had to be a better way. I didn’t want to spend my internship drawing polygons. I wanted to spend it building something that would draw polygons for me.
Enter PhenoSelect: a modular deep learning pipeline I developed to automate leaf segmentation and trait classification.
Before I started writing Python scripts, I looked at what was already out there. The landscape of phenotyping software is vast, but it tends to be polarized.
On one side, you have highly automated tools like ARADEEPOPSIS. It uses semantic segmentation to classify pixels as “healthy,” “senescent,” or “background”. This is great for whole-plant stress quantification, but it doesn’t distinguish one overlapping leaf from another. It gives you a “blob” of plant tissue, not a count of leaves or their individual sizes.
On the other side, you have user-friendly web apps that run instance segmentation. These can outline leaves beautifully, but they often lack the second critical step: classification. They tell you “This is a leaf,” but they can’t tell you “This is a fully visible, healthy leaf suitable for spectral analysis.”
I needed a hybrid. I needed a tool that could:
Segment: Find every individual leaf instance (Instance Segmentation).
Classify: Tell me if that leaf is healthy, mature, or fully exposed (Classification).
Scale: Process thousands of images with the scalability required for HTPP data.
… aaaand I also really want to learn more about neural networks and practical applications of it, so I closed my eyes and decided that this would be the best approach.
PhenoSelect is built on Python 3.10 and leverages the Ultralytics YOLOv11 framework. I chose YOLO (You Only Look Once) because of its balance between speed and accuracy. It processes the image in one pass, making it computationally efficient.
The first step was training the model to recognize leaves in complex canopy images. While the pipeline runs nicely on standard RGB images, I had access to a NIR1 (700-900nm) band. I swapped the Blue channel for this NIR band to squeeze out slightly better contrast between the leaf tissue and the soil/pot background.
To make the model robust against the chaotic nature of a plant canopy, I leaned heavily on Mosaic Data Augmentation. This technique stitches four training images together into a single mosaic. This forces the model to learn to detect leaves in different contexts and scales, crucial when you have leaves at various depths in the canopy that might look tiny compared to those in the foreground.
I experimented with five different model sizes: Nano (n) through Extra-Large (x). As you can see from the training metrics below, there is a trade-off. Larger models are “smarter” but require more GPU VRAM. Since I wanted the highest possible fidelity for scientific data, I settled on the YOLOv11x-seg (Extra-Large). It achieved a mean Average Precision (mAP50) of 0.949 on the validation set. In plain English: it rarely misses a leaf.
Once the leaves are segmented (cut out from the image), we enter the second phase. This is where PhenoSelect shines, acting not just as a labeler, but as a quality control filter.
I wrote a custom labeling tool (linked in the GitHub repo) that allows a user to rapidly tag these leaf cutouts with biological attributes like “Sun vs. Shade” or “Healthy vs. Chlorotic.” We then train a secondary classifier on these tags.
Crucially, I also introduced a specific fail-safe class: “Not a Plant”.
If the segmentation model from stage one gets overzealous and identifies a pot rim, a label stake, or a clod of soil as a leaf, the classifier (trained on leaf textures) catches it. It flags these objects as “Not a Plant” with high confidence, allowing us to automatically discard them from the final dataset. This feedback loop ensures that when you query the data for “Healthy Leaves,” you don’t get a CSV file full of soil clumps.
This manual provides a guide to the Image Classification Labeling Tool (toolbox\02_classification_labeling.py), a graphical user interface (GUI) designed as a radical lightweight classification tool for the labeling of image datasets for machine learning applications. The tool facilitates the rapid assignment of predefined labels to individual images, supporting both single-label (categorical) and multi-label classification tasks.
The application consists of two main components:
All project setup is performed within the Settings Window. To begin, click the gear icon (8) located in the top-right corner of the main view. This will open the Settings Window (2), where you will perform the following configurations:
With the settings applied, the annotation process takes place in the main interface.
Real-time feedback on your progress is shown in the top-right corner (9). The text "8 of 102 labeled (94 left)" indicates the number of annotated images and the remaining workload.
You might think running an “Extra-Large” neural network requires a server farm. It doesn’t.
I ran the inference on a 7-year-old desktop PC. Even on this aging hardware, PhenoSelect processed images at a rate of approximately 1 second per image. That includes loading the high-res image, running the segmentation, cropping the leaves, running the classification on every single leaf, and saving the data.
For a pipeline doing this level of analysis, that is okay. It means you can process an entire day’s worth of field data overnight on a standard office computer.
So, the code works. But does it help us understand the plants? This first showcase highlights the usability of the data. We aren’t just counting leaves; we are mapping physiological traits across the canopy.
Spatial NDVI Distribution: Because we have the precise mask for every leaf, we can calculate the Normalized Difference Vegetation Index (NDVI) at the organ level (given you have the corresponding spectral bans in your image). In the image below, we mapped these values back to the original coordinates. This visualizes exactly where the plant is stressed, revealing heterogeneity that a simple “whole plant average” would miss.
Canopy Architecture: By extracting the centroids of every detected leaf, we used a convex hull algorithm to calculate “Canopy Spread.” This provides a quantitative metric for how the plant occupies space, allowing us to track growth dynamics over the season automatically.
One of the most interesting aspects of this project was testing the transferability of the pipeline. We had data from a Specim IQ Hyperspectral (HSI) camera capturing 204 spectral bands.
My model was trained on 3-channel (RGB-NIR) images. Training a new model from scratch for 204 bands would have required massive amounts of new annotated data and computing power. Instead I tested how well the previous training applied the hyperspectral data.
I wrote a script to squeeze the 204 HSI bands into a 3-channel “Pseudo-RGB” image. I didn’t just average them; I used a Weighted Band Normalization by mapping the 204 bands to the specific sensitivity curves of a Zelux® 1.6 MP Color CMOS Camera (I just happen to work with this camera in the past a lot and know it quite well). By mathematically simulating how a physical sensor responds to light (Red peaks ~600nm, Green ~550nm, etc.), I created images that looked natural enough for the model to be able to transfer its knowledge:
The model, which had never seen HSI data before, achieved decent results out of the box (mAP: >0.8). After fine-tuning it with just 30 additional images, the accuracy jumped to a mAP50 of 0.903. This proves the model learned the fundamental concept of “what a leaf looks like,” regardless of the camera sensor used.
If you have made it this far, you might be under the impression that PhenoSelect is some sort of magic wand that solves all phenotyping problems – It isn’t.
What I’ve shared here is essentially the “movie trailer” version of a much longer, caffeine-fueled internship report. While we successfully demonstrated that a 7-year-old PC can outperform a team of manual annotators, there are layers to this project that I couldn’t squeeze into a single post without putting you to sleep.
PhenoSelect successfully automated the extraction of leaf-level traits, turning a data bottleneck into an analysis asset. It’s open-source, modular, and designed to be adaptable. Looking forward, the development of PhenoSelect has a clear roadmap. The highest priority is the implementation of a full Graphical User Interface (GUI) for the entire pipeline. Accessibility is a core objective here; I want researchers to use this tool without needing a degree in Computer Science.
If you are working in plant science and drowning in images, or just interested in how YOLOv11 handles agricultural data, check out the project.
If you try it out and get stuck (or if you just want to vent about manual annotation), drop me a message. I’ve been there.
I thought I spoke English until a bus driver in Cork threw me...
An introduction to PhenoSelect, an open-source deep learning pipeline designed to automate leaf...
A deep dive into the process of building a custom hardware and software...
An exploration into how hyperspectral imaging and machine learning can be used to...